If you have a computer with Windows 11, then it is easy to take a screenshot. All you need to do is: Press the Windows Key + S to open the Snapshot tool. Then click on the button that says “New Screenshot.” You can now choose what you want to capture.
You can also take screenshots by pressing the PrtScn key while holding the Windows key and the Print Screen button. However, Windows 11 eliminates complex functionality in favor of a new screen capture interface. In this article, we will show you how to take screenshots on Windows 11 in various methods.
How to take screenshots on Windows 11 using the Snipping tool?
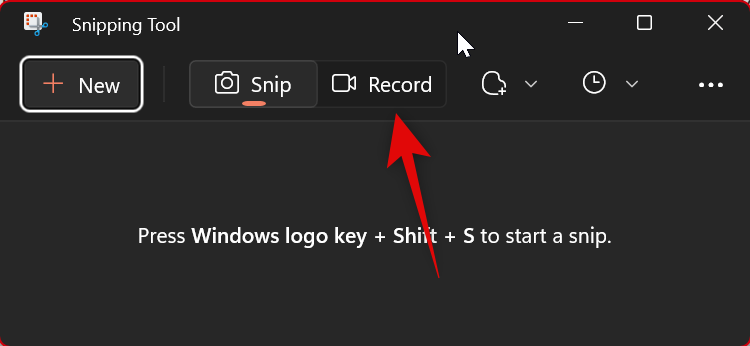
One way to take a screenshot on Microsoft Windows is to use the Snipping Tool. To do this, open the Snipping Tool by clicking the Start button and typing “snipping tool” into the search bar. Once the Snipping Tool is open, click on the “New” button to create a new screenshot. Next, select the window or area you want to capture. However, let’s discuss the method in detail.
Go to the Start menu:
If you want to take a screenshot of your computer screen and keep it as a picture, you can do so by going to the Start menu and selecting “Snipping tool.” Once the Snipping tool is open, drag your cursor across the area of the screen that you want to capture.
Type “snipping tool” in the search:
After clicking on the start menu, a search console bar will appear to you. You need to type “snipping tool” in the bar to take a screenshot on your computer. The snipping tool typically lets you take screenshots of entire windows, individual buttons on a window, or selected text. Once you’ve taken your screenshot, you can save it to your hard drive or share it with others using popular online sharing tools.
Click on the “New”:
If you’re using a laptop or desktop computer, one of the quickest and easiest ways to take a screenshot is by clicking on the “New” button in the toolbar after selecting “Screenshot.” This will take a screenshot of your entire screen, which you can then save as a picture or document. If you’re using a phone or tablet, there are several different tools available for taking screenshots.
Select your desired screenshot region:
The Snipping Tool is a handy Windows tool that lets you take screenshots of specific areas of your screen. If you want to take a screenshot of something on the window’s surface, select the desired region by dragging the mouse over it. If you want to take a screenshot of part of your screen but not its entirety, use the “Custom” option and specify the coordinates for where you want the screenshot to be taken.
How to take screenshots on Windows 11 using the Xbox Game bar?
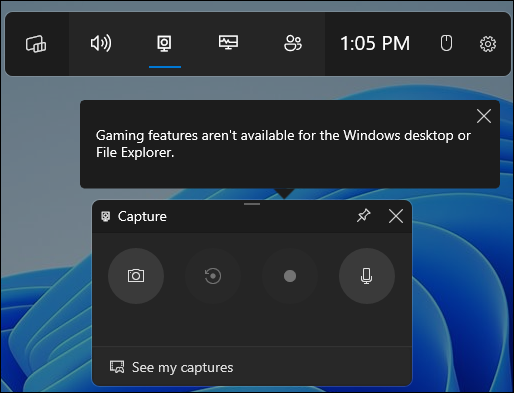
If you want to take a screenshot of something on your screen using the Xbox Game bar, there are a few different ways to go about it. You can use the capture button on the Xbox controller, or you can open the Game bar and select “Screenshot.” Let’s take a glimpse at the entire process.
Press the Win + G key:
If you’re working on Windows 11 and want to take a screenshot, you can press the Win+G key combination. The Xbox Game bar will appear and let you take the screenshot. You can also use this feature to capture video or audio recordings of your gameplay.
Navigate to the “Capture” area:
To take a screenshot of something on your computer screen using the Xbox Game bar, all you have to do is click on the “Capture” area and then press the Screenshot button. It can be a hassle to take screenshots phone using this method, but it’s a breeze on the computer. Just navigate to the “Capture” area and hit the button to take a screenshot.
Select the “Take screenshot”:
There’s an Xbox Game bar feature that lets you grab screenshots easily. Just select the “Take screenshot” option from the menu and hit the button that appears. Your screenshots can be easily shared online or saved to your hard drive for future reference.
How to take screenshots on Windows 11 using keyboard shortcuts?
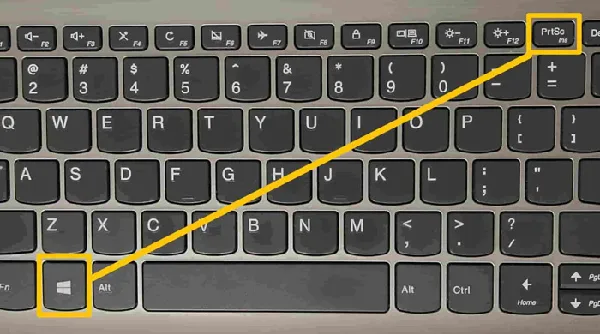
If you want to take a screenshot on your computer, but don’t want to use the mouse or keyboard, you can use the Windows Logo Key or PrtScn keyboard shortcut. Just press the PrtScn button and then click and drag the cursor over the area you want to capture. The image will be saved in your Pictures folder.
Keep in mind that Windows 11 introduces a new way to take screenshots using the Windows Logo Key (Win + prtScn) keyboard shortcut. To take a screenshot using the Windows Logo Key, first, open your screen in full-screen mode by pressing Win+F11 or by clicking on the Full-Screen button on the taskbar. After your screen is in full-screen mode, press Win+PrtScn together to take a screenshot.
Why it’s necessary to take screenshots on the computer?
There are many reasons why it is necessary to take screenshots on a computer. For one, if something goes wrong and you need to remember what happened, taking a screenshot can be extremely helpful. Additionally, if you’re studying a certain topic and want to keep track of important information, screenshots can be a great way to do that.
Meanwhile, if you ever need to provide proof of something, capturing the exact moment that happened can be invaluable. So whether you need to remember what happened or just want to make sure someone else knows what happened, taking screenshots on your computer is an essential task!
Conclusion:
If you’re looking for a way to take a screenshot on your Windows 11 computer, there are a few different ways you can go about it. One method is to press the PrtScn key on your keyboard. This will launch the Screen Capture utility and allow you to take a screenshot of your entire screen. Alternatively, you can use the Windows 11 Snipping Tool to capture just part of the screen.
You can also take screenshots using the Game bar. All you need is just open it and click on “Screenshot.” Once you’ve taken your screenshot, just hit “Save” to save it to your hard drive. However, in the meantime, you’ve found the methodologies of how to take screenshots on Windows 11. We hope you can utilize the methods to come up with the best result.
Frequently asked questions:
Screenshots are essential. You may need to take a series of screenshots every single day. To master the process, you may take a bird’s eye view in the following frequently asked questions.
Where do Windows 11 screenshots go?
Windows screenshots have traditionally been saved to the Pictures library on a user’s hard drive. But with Windows 11, that changed. Now, screenshots are saved to the Screenshots folder inside of the Photos app on a user’s computer.
How do you take screenshots on a Windows 11 laptop?
If you’re like most people, you take a lot of screenshots on your Windows laptop. You might use them to capture important moments, document what happened on a screen, or just for fun.
To take screenshots, first, open the Charms Bar. Click on the PC Settings button Under “General,” click on “Screen Shot.” Then select the area of the screen you want to capture and click “Take Screenshot.”
Why can’t take screenshots on Windows 11?
Windows 11 introduced the ability to take screenshots by pressing the Windows key + PrtScn. Plenty of users are happy with this feature, but some people have found that they can’t take screenshots on their Windows 11 computers.
Microsoft has not released a hotkey for taking screenshots in Windows 11, and there doesn’t seem to be an official workaround either. If you’re having trouble taking screenshots on your computer, there’s no need to panic. There are several methods you can use to capture an image of your screen without resorting to using the keyboard or mouse.
Why is PrtScn not working?
PrtScn is a key that allows you to start or stop your computer. When you press the PrtScn key, Windows usually starts up the system protection program. However, if your keyboard doesn’t have a PrtScn key, then Windows can’t start the system protection program.
So if you’re having trouble starting your computer and you think PrtScn might be the issue, first make sure that your keyboard has the correct key by looking at the back of it. If it doesn’t have a PrtScn key, then you’ll need to purchase a new keyboard or find an alternative way to start Windows.
